LearnPython has the Biggest Discount Ever! ------ Get $349 $129 Lifetime Access to all 13 Python Courses
Django Bootstrap Tutorial: How To Add Bootstrap to Django.
If you’re a back-end web developer who wants to make your Django website look good, you do not have to write HTML, CSS, or Javascript from scratch. You can simply use premade Bootstrap styles to quickly make your website look more appealing. This post will teach you how to add Bootstrap to Django so you can start using it to style your website.
There are three methods that most Django developers use to add Boostrap to Django. The first one is to use Bootstrap with Django via a CDN, the second one is by downloading the Bootstrap files and including them in your Django projects, and the third one is to use Django-bootstrap which is an app that you install in your Django project.
The best method to add Bootstrap to Django when working over an Internet connection is to connect via a CDN, you get the CDN link from Bootstrap’s website and copy and paste it into your Django template files.
If you are going to be working offline, it is best to add Bootstrap to Django by downloading the Bootstrap files from its website and including them in your Django project as static files.
I’ll show you how to carry out all these methods in the following sections.
Before you Add Bootstrap to Django
In this post, I assume that you have general knowledge of the Bootstrap framework and you just want to learn how to add it to your Django project. If you have not used Bootstrap before, you can still follow along with this Django-Bootstrap Tutorial but after that, you’d have to look at other tutorials on how to use Bootstrap to style your Django project.
At this point, I also assume that you have already created your Django project and you’re ready to start styling it with Bootstrap.
How To Add Bootstrap to Django via CDN
The fastest method to start working with Bootstrap in your Django project is to connect it via a CDN. A CDN stands for Content Delivery Network and it is a way of accessing remote files via a network. The CDN for this method is offered by Bootstrap. This method requires you to have an Internet connection when you’re working on your Django project. Here are the steps to add bootstrap to Django via CDN:
- Open your Browser and navigate to getbootstrap.com
- Under Include via CDN, copy the code under
<!-- CSS only -->or<!-- JavaScript Bundle with Popper --> - Paste the code in your Django templates.
- Test if your CDN is working
Let’s see this in action:
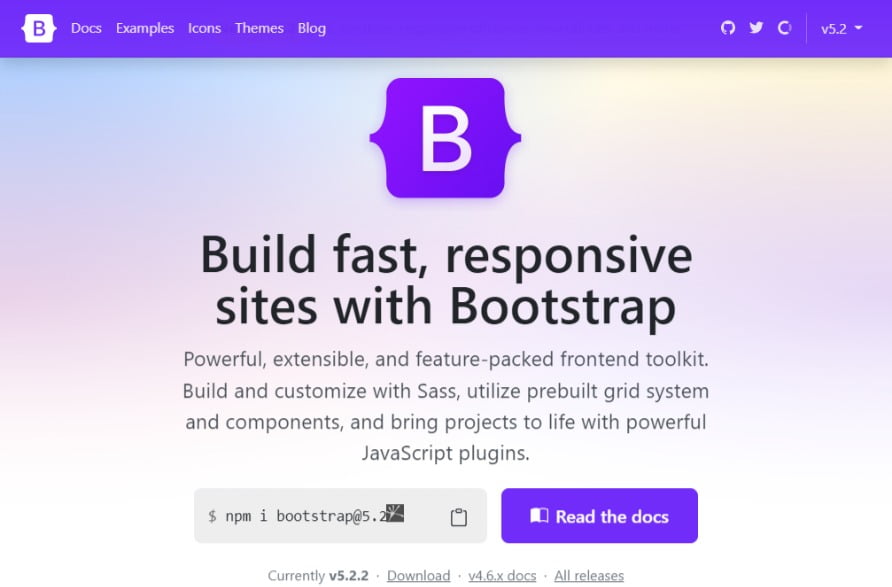
Step 1: Open your Browser and navigate to getbootstrap.com
The safest method to get the Bootstrap CDN is to copy it from Bootstrap’s official website.
Step 2: Under Include via CDN, copy the code under <!-- CSS only --> or <!-- JavaScript Bundle with Popper -->
There are two options to copy from here, what you’ll copy depends on what you want to use Bootstrap for in your Django project.
<!-- CSS only --> Bootstrap CDN

Copy the code under <!-- CSS only --> if you only want to use CSS Bootstrap in your Django project. CSS is only used for styling web pages, if you choose this option you won’t be able to add things like dropdowns, tooltips, poppers, and other actions that make your web page more interactive.
<!-- JavaScript Bundle with Popper -->
If you want your Django pages to be more interactive through actions like dropdowns, tooltips, and poppers, you should copy the code under <!-- JavaScript Bundle with Popper -->.

If you want to use Javascript in your Django project but without additional functionality like dropdowns, popovers, or tooltips, there is no need to include Popper.js. Bootstrap provides a CDN suitable for that but it is not included on the home page. To get it, head over to the Installation documentation, Under Quick start on number 2, copy the bottom-most line of code. Make sure the code you copy does not include popper.js in it.
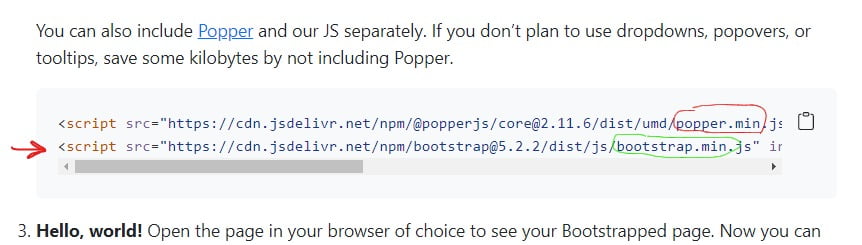
If you want to use both CSS and Javascript, copy both CDN links.
Step 3: Paste the code in your Django templates.
Go to your Django project’s templates folder and paste the CDN links in the suitable HTML files. Most probably in the base.html file to make the link accessible from other template files that are extending from it. Make sure you paste the CSS link between the <head> , and </head> tags. Paste the JavaScript files at the bottom of the <body>, and </body> tags.
Step 4: Test if your CDN is working
To make sure everything is working the way it should, style any of your written HTML with Bootstrap classes, run the Django server, navigate to the styled page and you should see your page looking better than before.
How To Add Bootstrap to Django via Downloaded Source Code
This method is best if you’re offline when you’re working on your Django project. It involves downloading Bootstrap styles and placing the files in your Django project. Here are the steps to add bootstrap to Django via the downloaded source code:
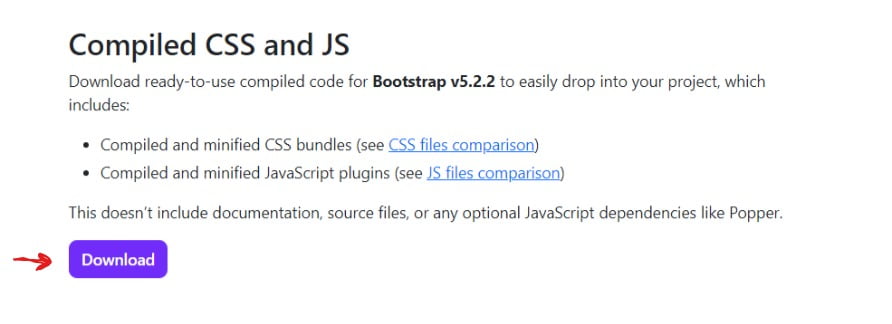
- Go to Bootstrap’s Download Page.
- Under Compiled CSS and JS, Click the Download button
- Unzip the Bootstrap folder
- Create and Configure a Static folder in your Django project.
- Copy the contents of the folder into the Static folder.
- Link to the Static folder
- Check if everything is working fine
Let’s do this step by step
Step 1: Go to Bootstrap’s Download Page.
The safest method to get the Bootstrap source code is to download it from Bootstrap’s official website.
Step 2: Under Compiled CSS and JS, Click the Download button
The Bootstrap code that we want is in the Compiled CSS and JS folder, so we have to download it.
Step 3: Unzip the folder
After the download, locate the folder on your computer and unzip it.
Step 4: Create and Configure a Static folder in your Django project
Let’s shift to our Django project a little bit. First, we want to create a static folder where we will store the Bootstrap code. At the root of your project, create a folder called static. In the settings.py file of your project, add the following code:
STATIC_URL = "/static/"
STATICFILES_DIRS = [BASE_DIR / "static"] #new (below the above line)
Step 5: Copy the contents of the folder into the Static folder
You should see that the folder is made up of 2 other folders, one called css and the other called js. In the css folder, delete all other files except the bootstrap.css file. In the js folder, delete everything except bootrap.bundle.js. Now copy these folders and paste them into the static folder we created in the previous section. Your project folders should be like below:
...
├── static
│    ├── css
│    │    └── bootstrap.css
│    ├── js
│    │    └── bootrap.bundle.js
├── templates
│    ├── base.html
│    ├── example.html
└── manage.py
Step 6: Link to the Static folder
Assuming that you have already created and configured your templates folder, navigate to the template file that you want to apply the Bootstrap styles. Most probably in the base.html so that these styles can also be accessed from template files that are extending the base file. The file should look like this at the end
➊{% load static %} #new

<!DOCTYPE html>
<html lang="en">
  <head>
    <meta charset="UTF-8" />
    <meta http-equiv="X-UA-Compatible" content="IE=edge" />
    <meta name="viewport" content="width=device-width, initial-scale=1.0" />
    ➋<link rel="shortcut icon" href="{% static './css/bootstrap.css' %}"> #new
  </head>

<body>

  ➌<script src="{% static './js/bootrap.bundle.js' %}"> </script> #new
</body>
</html>
At ➊, we load static so we can use it in our Django template file.
At ➋ we link our CSS file from the static folder. Note the syntax is different from the usual HTML. At ➌ we link our javascript file using the script tag.
Note that the CSS link is in the head section while that of the JS is in the body section.
step 7: Check if everything is working fine
Finally, check if everything is working by adding a Bootstrap class and checking the output.
How To Add Bootstrap to Django using the Django-Bootstrap-v5 app
Django-Bootstrap is a Django app that you can install in your Django project so that you can be able to use Bootstrap styles with Django. Using Django-Bootstrap is different from the above methods because it does not use actual Bootstrap styles. Instead, it uses tags to apply styles to HTML elements. Below are the steps to install it in your project:
- Install Django-Bootstrap-v5 via pip
- Register the app in INSTALLED_APPS
- load the django_bootstrap5 library in your templates
- Start using the tags
Step 1: Install Django-Bootstrap-v5 via pip
Activate the virtual environment of your project and run the following command in the terminal
$ pip install django-bootstrap-v5This will install Django-Bootstrap-v5 in your Django project.
Step 2: Register the app in INSTALLED_APPS
Next, register the app django-bootstrap-v5 in the settings.py of your Django project folder. This will let Django know that we’ll be using it in our project.
INSTALLED_APPS = (
    ...
    "django_bootstrap5",
    ...
)
Step 3: Load the django_bootstrap5 library in your templates
In the base template of your Django project, load django_bootstrap using the load tag. Place the code on top of the template file. You can also load them separately if you want to:
{# Load the django_bootstrap5 library #}
{% load django_bootstrap5 %}

{# Load CSS and JavaScript separately#}
{% bootstrap_css %}
{% bootstrap_javascript %}
If that file is the base template, the app will be loaded in other template files that are extending the base file. There won’t be any need to repeat this step again in those other files. You can now start using the Django-bootstrap tags in that base files and the template files that are extending it.
Step 4: Start Styling using Django-Bootstrap tags
After the previous step, you are ready to start using django-bootstrap to style your template files. Let’s see how this can be done. We will design a Django form just as an example:
<form action="/url/to/submit/" method="post" class="form">
  {% csrf_token %}
  {% bootstrap_form form %}
  {% buttons %}
    <button type="submit" class="btn btn-primary">
      Submit
    </button>
  {% endbuttons %}
</form>
Now run the server and you should see your form styles change for the better. To learn more about how the django-bootstrap library works and more other tags. Check out its official documentation website.
That’s it for this tutorial. Peace!
