LearnPython has the Biggest Discount Ever! ------ Get $349 $129 Lifetime Access to all 13 Python Courses
How to run Django Development Server: django runserver
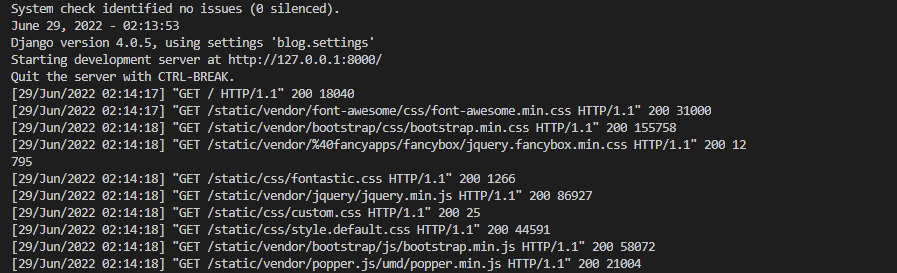
To run the Django development server, type the command python manage.py runserver within your project’s terminal and press enter. Upon successful launch, Django will host the server on localhost port 8000 (127.0.0.1:8000). You can then access this address via your web browser. The server will output a real-time log of all activities occurring on the site in the terminal.
Django also provides several options to tailor the server’s operation. For instance, you can modify the server’s port and IP address or configure it to not reload automatically after changes in the project’s code. These advanced configurations will be discussed in upcoming sections.
Should there be any issues with your project, Django will display an error message detailing the problem that must be resolved before the server can be restarted. To terminate the development server, use the CTRL + C keyboard shortcut.
Table of Contents
- Why Run Django Server.
- How To Run Django Server.
- Running Django Development Server On A Specific Port and IP Address.
- How To Make Django Server Viewable to Other Devices. (Mobile, Tablet, Computer)
- How To Disable The Django Server Auto-reloader
- How To Quit Django Development Server.
- Frequently Asked Questions: How To Run Django Development Server.
- Conclusion: How To Run Django Development Server.
Why Run Django Server.
When developing a web project with Django, it is always a good idea to check if everything is going well each time you make changes to your code. To do that in the backend, we normally use Django tests, but to do that visually, we have to look at the output (in the eyes of the client). Django helps us achieve this by allowing us to run the Django development server, which lets us view how the web project would look to the client.
How To Run Django Server.
Running the server is one of the very first things Django developers do during the configuration of a Django project just to make sure everything is working fine.
There are multiple methods to run the Django development server. Here are some points to take into consideration when running the Django development server.
- While the server is running, you cannot run any other commands in that same terminal. If you want to run other commands while keeping the server running, you have to open a new terminal.
- A single Django project can be served by as many servers as desired, provided that each server is listening on a separate port. All you have to do is to open a new terminal and run the
python manage.py runserver [different port]again. - By default, the server is always checking for changes in your project’s code, and when a change happens, the server is automatically restarted to cater to those changes. Therefore you do not always have to run the server every time you change your code.
Now let’s get into the different methods to run the Django development server.
Method 1: Running The Django Server With manage.py.
Running the Django server with python manage.py runserver is by far the most popular method and one of the easiest. This is because, in our manage.py file, the DJANGO_SETTINGS_MODULE environment is automatically set to our Django project’s settings.py by default. Here’s a peek.
# manage.py
...
def main():
    """Run administrative tasks."""
    os.environ.setdefault('DJANGO_SETTINGS_MODULE', 'blog.settings') # here
    try:
...
This makes it simply the best method for small projects or for beginner Django developers. Here is how you run it.
$ python manage.py runserverThis can also be written in a different way.
$ ./manage.py runserverThis simply translates to ‘use the manage.py file in the current folder to run the Django development server.’
Method 2: Running the Django Server With python -m and django-admin.
The following methods: python -m django runserver and django-admin runserver need a bit of configuration before you can start using them. If you attempt to use them before making that configuration you will get an error and you might think that something is wrong with your project but if you look closely at what the error is saying then that may point out something about the DJANGO_SETTINGS_MODULE environment variable.
$ django-admin runserver
...
raise ImproperlyConfigured(
django.core.exceptions.ImproperlyConfigured: Requested setting DEBUG, but settings are not configured. You must either define the environment variable DJANGO_SETTINGS_MODULE or call settings.configure() before accessing settings.
That simply means we should create the DJANGO_SETTINGS_MODULE environment variable. There are two methods to do this. You can either set the environment variable at once to be able to run the commands or specify the settings file every time you run one of the commands.
Setting the environment variable once.
If you’re on Mac or Linux, do the following before you run the python -m django runserver or django-admin runserver.
$ export DJANGO_SETTINGS_MODULE = project_folder.settingsIf you’re on Windows:
$ set DJANGO_SETTINGS_MODULE = project_folder.settingsYou just have to do this once and all the two methods will start working.
specifying the settings file every time
If you’d rather prefer to specify the Django settings module every time you run the commands, then you can do it using the --settings argument.
$ django-admin runserver --settings = project_folder.settingsor
$ python -m django runserver --settings = project_folder.settingsAnd that will be it.
Which Method Should you use?
If you’re working on a small project that has one settings file, then using manage.py is the way to go.
However, if you’re working on a big project that has many settings files, you may need to run the server using a different settings file. In that case, you may have to use either of the other two methods.
Running Django Development Server On A Specific Port and IP Address.
By default, Django runs the server on the localhost port 8000 (127:0:0:1:8000), if you’d rather prefer a different one you simply have to specify it next to any of the above commands before you hit enter. Below is an example:
If you want to run your Django project on IP address 123:168:0:1 port 6000, then you have to do it this way:
$ python manage.py runserver 123.168.2.1:6000or
$ python -m django runserver 123.168.2.1:6000or
$ django-admin runserver 123.168.2.1:6000The Django Project documentation offers some more examples to implement running the Django development server on different ports.
How To Make Django Server Viewable to Other Devices. (Mobile, Tablet, Computer)
Here are a few things to do before you can make the Django server viewable to other machines:
- make sure the machine you want to view the server from is on the same network as the one that is running the server.
- Get the IP address of the network.
Once that is done, follow the steps below:
I’ll demonstrate the following steps using the IP address 192.168.8.104.
Step 1: add your IP address to the list of allowed hosts
In the settings.py file of the project folder, add the IP address to the list of allowed hosts.
...
ALLOWED_HOSTS = ['192.168.8.104']
...
Step 2: run the Django server specifying the IP address
Using any of the methods above, run the Django development server specifying the same IP address of your network. You can use any port, in this case, I use port 8000.
$ python manage.py runserver 192.168.8.104:8000Now if you can open your browser and go to the address 192.168.8.104:8000 using any machine in the network you’ll be able to view the site. Even on your mobile device.
How To Disable The Django Server Auto-reloader
As I have said above, the Django server is always checking for changes in your project’s code, and when a change happens, the server is automatically restarted so as to cater to those changes so you do not always have to run the server every time you change your code. You can disable this feature so that when you change your project’s code, the server will not take those changes into effect thereby not restarting the server. To do that you have to use the --noreload command.
Here is an example:
$ python manage.py runserver --noreloadAnd that will do.
How To Quit Django Development Server.
To quit the Django development server, use the keyboard shortcut CTRL + C.
Frequently Asked Questions: How To Run Django Development Server.
How do I know if the Django server is running?
You can use either of the following methods to check if the Django server is running:
When the server is running, Django prints out in real-time all the actions that are taking place on the site, including the HTTP methods, which are GET, POST, PUT, and DELETE.
Alternatively, you can head over to the address you are running your server on. If it is already open in your browser, you can refresh it. If your server is running, your browser should render the site, but if not, it returns an ERR_CONNECTION_REFUSED error code.
Conclusion: How To Run Django Development Server.
You learned the quickest and most popular way to run the Django development server and other alternatives that do not use the manage.py file. You then learned how to run the Django development server on a specific port and IP address and other methods like viewing the server on a different machine and turning off the Django auto-reloader.
I hope you found this post helpful; if so, please share it with fellow Django developers. If you need any help following this post, please let me know in the comments section below. I’ll be happy to help. Otherwise, see you in other Coding Gear articles. Peace.
