LearnPython has the Biggest Discount Ever! ------ Get $349 $129 Lifetime Access to all 13 Python Courses
How to Create Form from Model in Django
This post will show you how to create a form from a model in Django using the ModelForm class.
Assume you’re developing a book website where users may add Books with information such as title, synopsis, and cover for each book. You will, of course, need a form for this. But instead of creating the form from scratch, you can utilize the ModelForm class to convert the fields of an already existing model into a form. On the most basic level, all you have to do with ModelForm is specify the model and the fields you wish to inherit from the model.
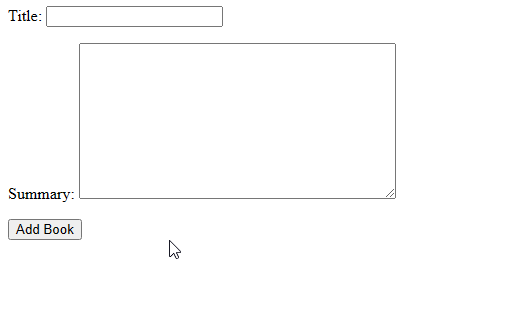
Table of Contents: Create Form from Model in Django
- Step 1: Create a model in the models.py
- Step 2: Create Form from Model in the forms.py
- Step 3: Create View to render the form in Template and validate the user input.
- Step 4: Create a URL for the View
- Step 5: Render the form in a Template
Follow these steps to create a form from a model in Django:
- Create a model in the
models.py - Create Form from Model in the
forms.py - Create View to render the form in Template and validate the user input.
- Create a URL for the View
- Render the form in a Template
This post assumes that you have already created a Django project and have configured your templates directory.
Step 1: Create a model in the models.py
In the models.py of your app folder, you have to create a model. You will use the fields of that model to create form elements. The user input that is entered into that form will be saved in the model’s table.
If you’ve already created a model that you want to create a form for, then feel free to skip to the next section.
For this example, I will use the model below.
class Book(models.Model):
    title = models.CharField(max_length=100)
    summary = models.CharField(max_length=250)

    def __str__(self):
        return self.title
The Book model above has the fields title and summary.
We are not going to create a form from scratch since we already have the model that has fields that can be turned into a form. The ModelForm class requires us to provide at least two things which are, the model and the fields you want to inherit from the model.
After you create the model, make sure you make migrations then migrate them to the database with these two commands:
$ python manage.py makemigrations
$ python manage.py migrate
Step 2: Create Form from Model in the forms.py
After creating a model in models.py, first, you have to create a forms.py file in the same app folder as the models.py. If your project had been created using the startproject command, the forms.py file will not be included by default, therefore you have to create it yourself.
After that, you have to create a class that inherits from the ModelForm. Your file should look like this:
➊from django.forms import ModelForm
➋from .models import Book

➌class BookForm(ModelForm):

    ➍class Meta:
        ➎model = Book
        ➏fields = ['title','summary']
At ➊ we import ModelForm from django.forms which is the class that will allow us to create a form from a model.
Next at ➋, we import the Book model, which is the model that we want to create a form.
After that, create a class, ➌, and name it what best describes its usage. In this case, I called mine BookForm. Make sure it is inheriting from ModelForm.
Inside that class, create a Meta class ➍. The basic information we have to pass here is the model from which the form is created and the fields that should be present in the form when it renders on a webpage.
For the model,➎ we passed in Book, which we imported above. For fields ➏, we included all the fields in a list, alternatively, we could also have written it like this: fields = '__all__'. It’s just another way of doing it, with the same effect, of course.
The above is the most basic example you can do, but it will work just as fine. To learn more about customizing your forms and adding more functionality, check out Django’s documentation on ModelForm class.
Step 3: Create View to render the form in Template and validate the user input.
Our form is done, now we have to create a view. The view has to do at least two things which are to pass the form to a template so that a user can interact with it and validate the information passed in the form by the user and to save the information into the database.
Here is what that view may look like:
➊from django.shortcuts import render, HttpResponse
➋from .forms import BookForm

def upload_book(request):

    ➌if request.method == 'POST':
        form = BookForm(request.POST)
        ➍if form.is_valid():
            form.save()

            ➎return HttpResponse('<p>Info Saved!</p>')
        else:
            return HttpResponse('<p>Info is not Valid</p>')

    ➏else:
        form = BookForm
        context = {
                'form': form,
        }

        return render(request, 'upload_book.html', context)
Our view is divided into two parts. The if ➌ and the else ➏ statements.
The else part displays the form in the template when the request method is GET, meaning when a user first navigates to the webpage. First, we store our form in a variable called form, then we pass it to a template.
Once the user enters the input in the form and hits the post button, the request method will change to become POST, therefore the if part ➌ of the if-else statement will be executed.
First, we pass the information entered by the user in a variable called form. We use another if statement to validate the information using the built-in is_valid() function ➍. If the information is valid, it will be saved to the database and we will notify the user by returning a response using HttpResponse ➎.
We use HttpResponse in this case because we don’t have another webpage to redirect the user after the input is saved. If your project has other pages you can use the redirect method to do that.
If the data is not valid, we also return a response using HttpResponse but with a different message that says Info is not Valid.
If your Model fields contain a field with ImageField, check out how to upload image files in Django.
Step 4: Create a URL for the View
Create a urls.py file in the app folder and link it to the project-level urls.py file.
In the urls.py file, add the following code:
from django.urls import path
from . import views

urlpatterns = [
    path('', views.upload_book, name='upload-book')
]
When the user gets to the homepage (which is denoted by the empty quotes), the upload_book view that we created previously is going to be called. We also include the name parameter. It is a best practice to always do so. We usually use this name parameter for linking pages with each other.
If you wanted this form to be displayed on a different URL, you can change the first parameter to what you want.
Our view and URL are done, let’s create a template to render this form.
Step 5: Render the form in a Template
I’m assuming that you’ve already configured the template directory for your project.
In the templates folder, create a file called upload_book.html. This name comes from the name we used in our views. If you used a different name, it has to correspond with the name of the template.
The template should look something like this:
<form method="POST">
    {% csrf_token %}
    {{ form.as_p }}
    <button type="submit">Add Book</button>
 </form>
This template renders the form on the webpage using {{ form.as_p }} accompanied by a button that reads Add Book. We also include the {% csrf_token %} which is required for every form to enhance our project’s security.
Testing the Form created from Model
Now our form has been created. Let us test it out.
Run the server of your Django project. And navigate to the homepage. It should look something like the below:
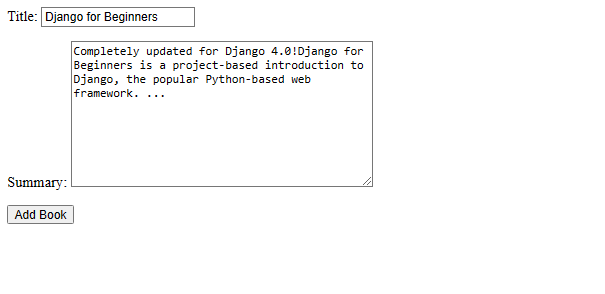
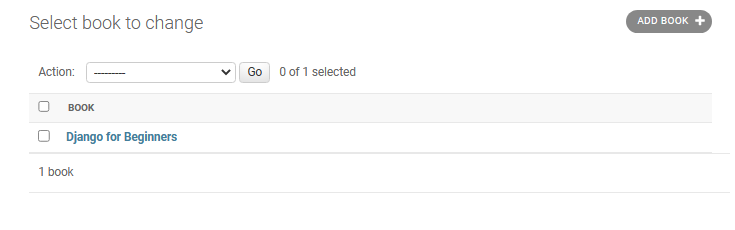
Now enter some information and press the Add Book button. To check if the user input has been saved to the database, you have to access the Django admin site. But first, you have to register the model to the admin.
Thank you for reading this post on how to create a form from a model in Django. If you have any questions, feel free to use the comments section below.
