LearnPython has the Biggest Discount Ever! ------ Get $349 $129 Lifetime Access to all 13 Python Courses
Django MySQL Setup: How to Connect Django to MySQL (2 Best Methods) 🔗.
Django, the Python web development framework that we all love, comes with many built-in features that are beneficial to the developer. At some point during the development of a Django project, you create a superuser whose signup details (username, email, and password) you can use to login into a beautiful, feature-rich admin panel where your registered models and other cool things appear. Then it also allows you to customize it until it looks nothing like it has been before like making it display images in the admin.
Another thing that Django does for us is to come pre-configured with a fast and easy-to-use database engine called SQLite. This allows you to start working on your project faster without having to worry too much about configuration. If you’re a beginner, this is very cool, isn’t it? You can use it for all your local development and learning projects if you want to.
But here’s the thing; When it comes to production development, SQLite simply does not cut it for many reasons that are not in the scope of this post. In that case, it is recommended to use other production-made database engines. Luckily, Django supports four of these, (in addition to SQLite): PostgreSQL, MariaDB, Oracle, and MySQL. In this post, I’ll show you how to connect Django to the MySQL database engine.
As a matter of fact, if you decide to use a production-ready database, it is also recommended to configure that database right at the beginning when you’re creating a Django project and Django apps before you run your first migrations. This is done to avoid the small bugs that creep behind when you change from one database to another. That’s why this post is going to teach you how to connect Django with MySQL database from the very beginning when we install Django.
Table of Contents
- How to Connect Django to MySQL Using XAMPP.
- How to Setup Django with MySQL Using MySQL Server.
- Step 4: Please Follow Steps 4-6 From Method 1🙏.
- Conclusion: How To Connect To MySQL Database From Django
How to Connect Django to MySQL Using XAMPP.
The first method we will use to connect MySQL with Django is by using XAMPP (Apache server, MariaDB, PHP, Perl). With XAMPP, all you need to do is download the server, install it on your computer, activate it, and connect it with Django from Django’s settings.py, and you’d be ready to go. Follow the steps below to do that.
Step 1: Download and Install XAMPP from its official website.
➊In your browser navigate to https://www.apachefriends.org/download.html (which is the official download page of the XAMPP server)
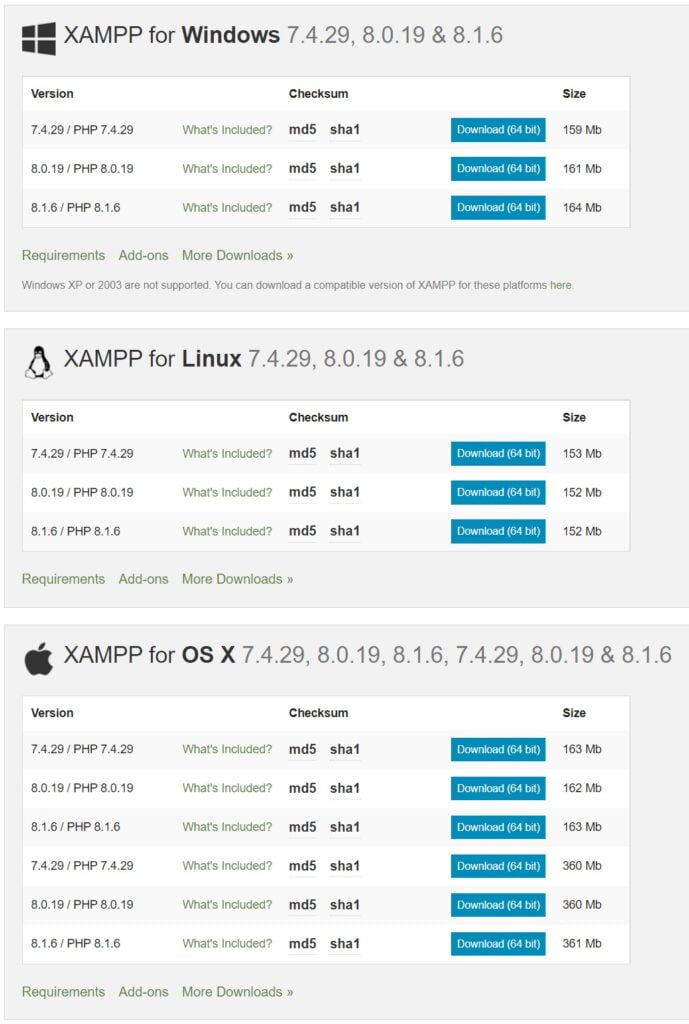
➋Choose your operating system and the version you’d like to download. The latest version is always the most preferable which in this case is found at the bottom of the list for each OS 🤔. If you click on ‘What’s Included‘ you can see a list of all the components that will be installed along with your XAMPP installation.
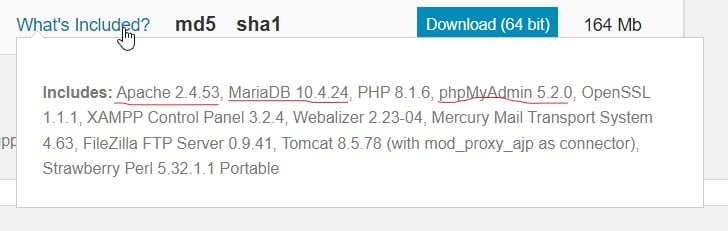
As you can see from the pic above, what we’re interested in is Apache, MariaDB(which is almost just the same as MySQL), and phpMyAdmin (which is a graphical user interface to interact with our data).
➌Hit the ‘Download‘ button and wait for your download to finish.
➍Once the download is complete, navigate to the installer on your computer and double-click it to start the installation wizard.
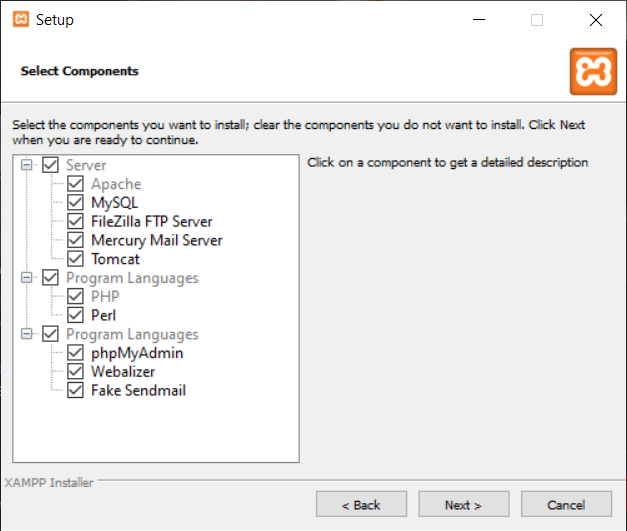
➎When the installation starts, what we are really interested in is the second step (where we choose what we want to install). One can as well go ahead and install all there is(which is what I recommend), but if you choose to eliminate some components, the only two you should not are MySQL and phpMyAdmin; in addition to Apache and PHP which are required for the installation, thus their checkboxes are disabled.
➏For all the next steps, click the ‘Next >‘ button until the installation is complete. After that, delete the installer.
Step 2: Start The XAMPP Server.
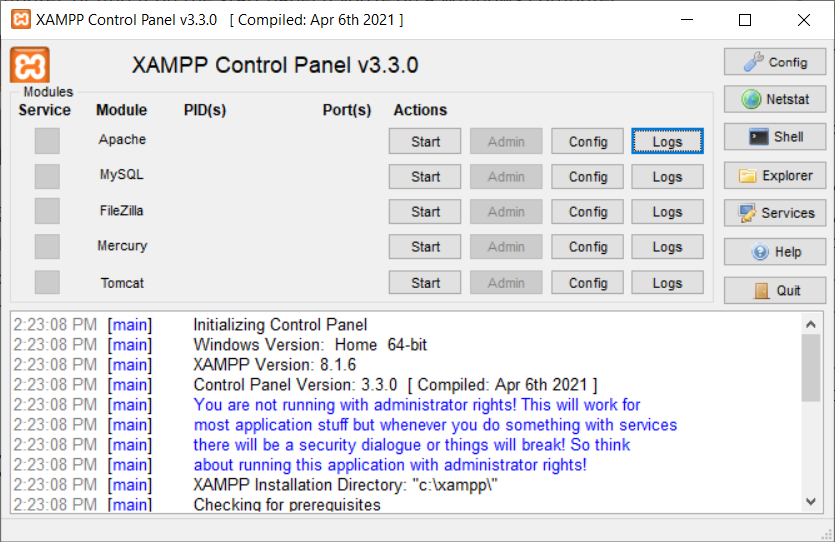
➊After the installation is complete, start the XAMPP Control Panel, you can search for it on your computer. If you’re on a Windows computer, you can also find it on the Start menu.
➋Looking at the XAMPP control panel or dashboard, you can see the modules that are available (based on what you chose to install) and some actions we can do with them. What you need to make sure you have are Apache and MySQL. If you don’t, please go back to step 1 and reinstall XAMPP, making sure you include the required modules. You can also see that the Admin buttons are disabled, that is because you can not run the admin panels when the servers themselves are not running.
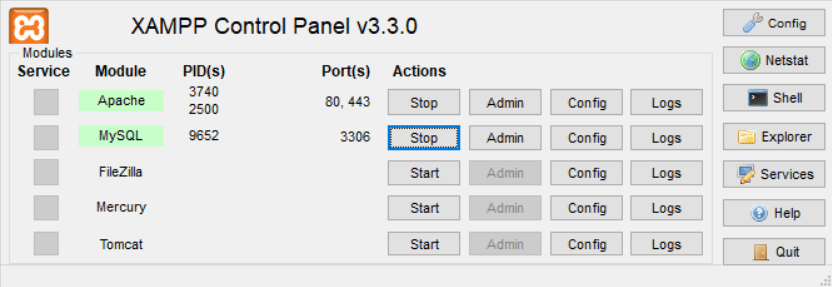
➌Click the Start button for Apache, and the start button for MySQL. The names of the modules should have a green background to indicate that the servers are running and the ports at which they are running should appear. You can also see that the corresponding Admin buttons are now activated.
Step 3: Create A MySQL Database.
➊To create a MySQL database, click the Admin button next to MySQL.
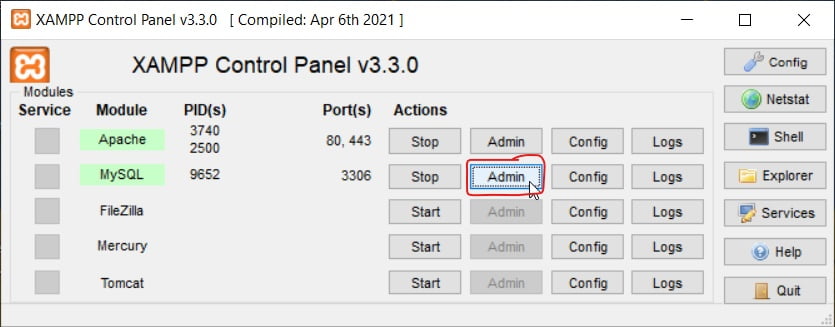
This will open the phpMyAdmin panel in your browser where you will be able to create your database.
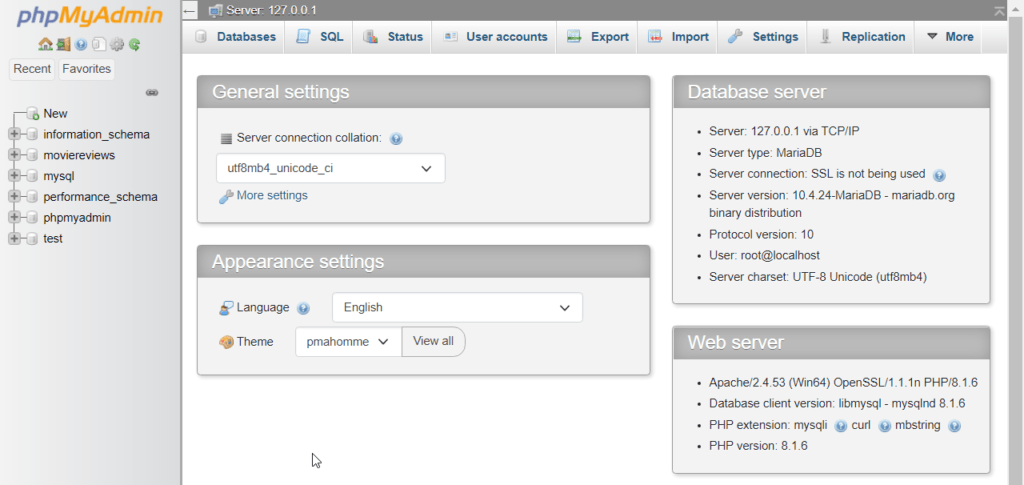
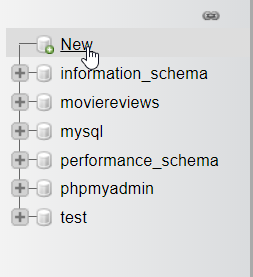
➋On the left panel of the dashboard, click on New.
➌On the right panel, type in the name of the database and choose the collation of utf8mb4_general_ci (which is the default configuration)

➍Hit the Create button. Note that the name you type here is the one you will use in Django’s settings.py file. The database is done, let’s connect to it from Django.
Step 4: Install A MySQL adapter In Your Django Project.
MySQL adapters allow us to connect to MySQL from the Python side. There are several to choose from, but I will show you the most popular and the fastest ones, which are mysqlclient and pymysql. Mysqlclient should always be the preferable option because of performance and support. If things don’t work (which is very rare), you can always use the second option.
Option 1: Install mysqlclient in Your Django Project
Assuming that you have your Django project already created, navigate to the project folder on the terminal (the folder with the manage.py file) and run the following command. (If you’re using a virtual environment, make sure it is activated).
(env) $ pip install mysqlclientThe (env) at the beginning indicates an activated virtual environment called env. After the command runs, you’ll be done, it is now time to tell Django to use MySQL instead of the default SQLite. We do this in our settings.py.
Option 2: Install pymysql in Your Django Project.
➊Pymysql allows us to connect any Python application (in this case, your Django project) with the MySQL database. Assuming that you have your Django project already created, navigate to the project folder on the terminal (the folder with the manage.py) and run the following command. (If you’re using a virtual environment, make sure it is activated).
(env) $ pip install pymysqlThe (env) at the beginning indicates an activated virtual environment called env.
➋By default, Django wants to use MySQLCLient to make a connection with MySQL database, but because we used pymysql in this case, we have to update our __init__.py file. Go ahead and add this two lines in the file.
import pymysql
pymysql.install_as_MySQLdb()
Step 5: Connect To The Database From Django’s settings.py.
➊Open your project with a text editor and navigate to the settings.py of your Django project. If you have not configured any other databases for your project before, the DATABASES dictionary should look something like this for Django 4+.
DATABASES = {
    'default': {
        'ENGINE': 'django.db.backends.sqlite3',
        'NAME': BASE_DIR / 'db.sqlite3',
    }
}
You can see that the database ENGINE is pointing out to sqlite3, which is the default database for any Django project. It is time to change these settings so that Django can point out to the MySQL database engine and the corresponding database we created earlier in step 3.
➋Change the DATABASES dictionary to look like this.
DATABASES = {
    'default': {
        'ENGINE': 'django.db.backends.mysql',
        'NAME': 'database_name',
        'USER': 'root',
        'PASSWORD': '',
        'HOST': '127.0.0.1',
        'PORT': '3306',
        'OPTIONS': {'init_command': "SET sql_mode='STRICT_TRANS_TABLES'"},
    }
}
When you upload your Django project to Github or to any other hosting service for software development, you should not leave sensitive information about your database exposed, like the database name, user, and password. Check out my post on how to use environmental variables to conceal the sensitive information.
Let me explain what each of these declarations is doing.
• ENGINE: as I’ve said above, it is pointing to the database engine we are using; which is MySQL. You can see the mysql declaration at the end of the value.
• NAME: Back in step 3, you gave your database a name, it is the one we are referencing here (it should be exactly the same, make sure there are no spaces in the string❗). If you somehow forgot the name, go back to your phpMyAdmin panel to check the list of databases you have.
• USER: USER is the username you used to log in to the phpMyAdmin panel. If you did not enter any, it should be ‘root‘ by default.
• PASSWORD: As the user, PASSWORD is the password you used to log into the panel, if you did not enter any, it is nothing by default. Just leave an empty string. However, it is important that you create strong passwords.
• HOST: The host here is referring to the IP address, we type 127.0.0.1 to indicate the localhost.
• PORT: If you remember when you started the MySQL server, a port appeared under the port(s) column. That is the port you should write here. By default, it is 3306.
• OPTIONS: The last one is OPTIONS which we now have to declare starting with version 5. 7 of MySQL. If you have left out this option, you will get a warning like the one below when you migrate the database migrations.
WARNINGS:
?: (mysql.W002) MariaDB Strict Mode is not set for database connection 'default'
        HINT: MariaDB's Strict Mode fixes many data integrity problems in MariaDB, such as data truncation upon insertion, by escalating warnings into errors. It is strongly recommended you activate it. See: https://docs.djangoproject.com/en/4.1/ref/databases/#mysql-sql-mode
What we are simply doing with this command is activating the STRICT_TRANS_TABLES to prevent, among other things, loss of data. It is essential that you always add this command for all your Django connections with the MySQL database.
If you go back to the phpMyAdmin panel, you should expect to see your database tables, but No. This is because you have not yet migrated the Django models to reflect on your Database. The next step is to do just that.
Step 6: Migrate the Database.
If you have created your own custom Django models, you need to make migrations first before you migrate the database by running the following command:
(env) $ python manage.py makemigrationsNote: If you had already entered some data before the switch, all of it will be wiped away❗. Even the super user if you’d created one. This is the reason why database integration is one of the first things you have to do whenever you start a project.
But if your project is freshly new, just run the following command and you’d be good to go.
(env) $ python manage.py migrateThis command creates database tables for the models available (The models that come with Django). If you refresh your phpMyAdmin panel, you should see the database tables reflecting. That is all with this method.
How to Setup Django with MySQL Using MySQL Server.
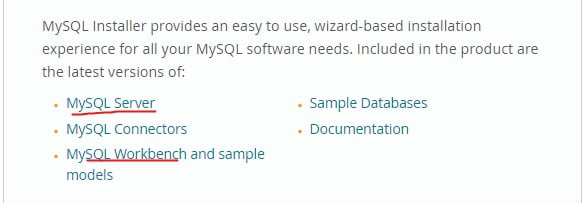
This method involves using the products from the MySQL website itself. Instead of Apache, we use the MySQL server, and Instead of using phpMyAdmin, we use the MySQL Workbench as the panel to interact with the database.
Rather than downloading the Mysql server and the Mysql workbench separately (which is very possible), you can download and install the whole of MySQL itself which contains both modules, plus other goodies as well. During the installation, we just have to make sure we won’t install other unnecessary packages that we are not going to use to connect the MySQL database with Django. Note: This may be a rather long and tedious installation, you can play Candy Crash along with the installation😀.
Step 1: Install MySQL Server and MySQL WorkBench(optional) On Your Computer.
Follow the steps below to install MySQL on your computer.
➊Go to the MySQL Community Downloads page.
➋Select Your Operating System from the ‘Select Operating System…’ drop-down menu.
➌MySQL offers you two installers, the mysql-installer-web-community , and the mysql-installer-community. Choose the former if you’d be connected to the internet during the installation and the latter if you’d be not connected to the internet during the installation.
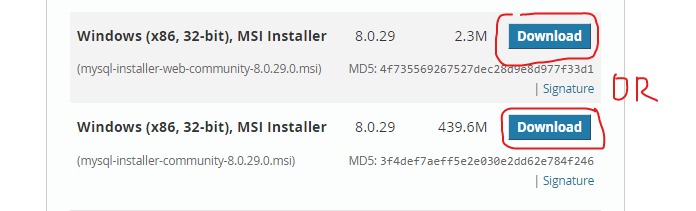
You can see that the web installer is much smaller than the offline installer but the steps are the same. So whichever you choose, the installation will be the same. However, If you’re going to choose the offline installer, it would be better to install these modules one by one❗.
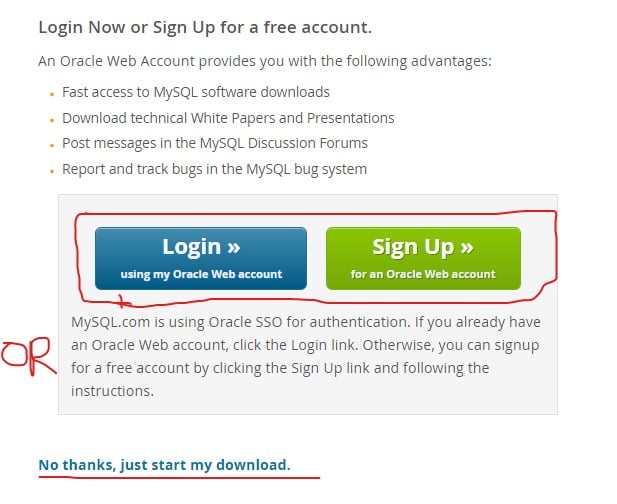
➍On the next page, choose ‘Login‘, ‘Sign Up‘, or ‘No thanks, just start my download.‘
➎When complete, start the installer, let’s go through the important steps together.
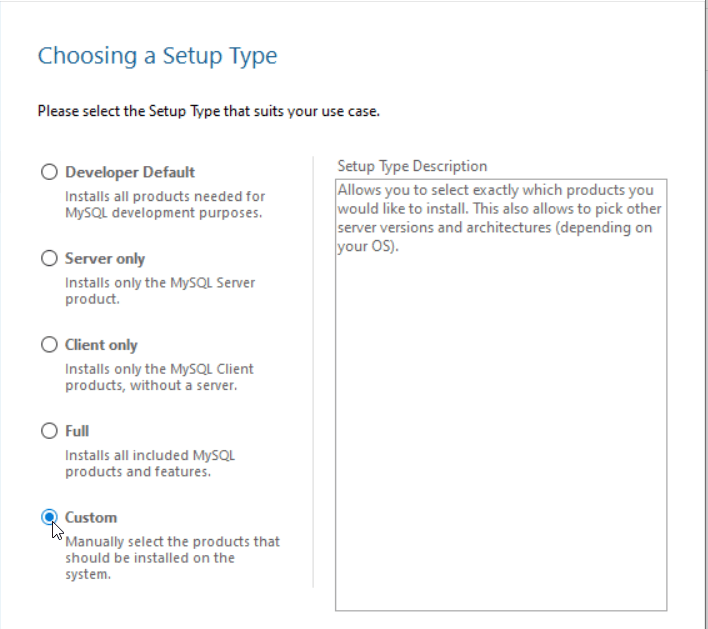
Choosing A Setup Type.
Since we know exactly what we want to install (the MySQL server and the MySQL workbench), we can go ahead and choose the custom installation. This is because all the given options do not offer exactly what we want without adding or removing other modules.
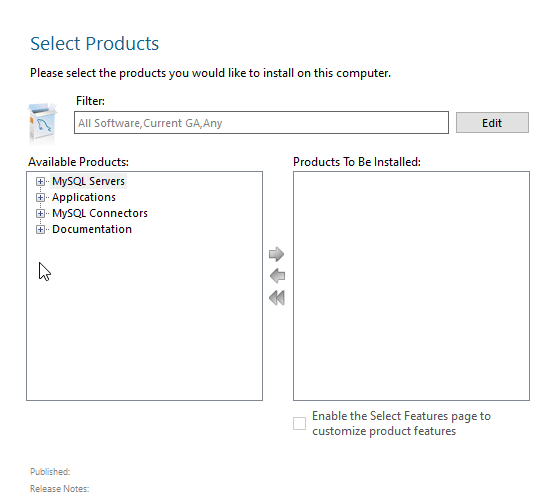
Select Products
In the Available Products panel, under MySQL Servers, select MySQL Server 8.0.30 -X64, and under Applications select MySQL Workbench 8.0.30 -X64. Follow the GIF below for more elaboration.
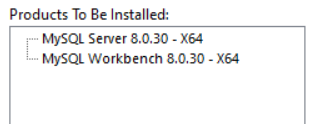
The ‘Products To Be Installed‘ panel should look like this:
Don’t worry about the ‘Enable the Select Features page to customize product features‘ checkbox at the bottom right. We won’t go that deep. After you are done, hit the Next button.
➥These two steps were the most important, I’m pretty sure you can finish the rest of the installation by yourself. That’s a compliment 😃!
Hint: Just leave the defaults as they are and don’t forget your password❗.
After the installation, go ahead and delete the installer.
Step 2: Start The MySQL Server.
By default, depending on what you chose during the installation, the MySQL server may be set to start running during the startup of the computer. If you had selected that option during the installation, chances are the server is already running right now. But if you did not, you have to do it manually. Here’s how to do it:
Option 1: Using the Command Line.
➊First, you have to find where the bin folder of your MySQL installation is found. It’s usually this one: C:\Program Files\MySQL\MySQL Server 8.0\bin. (Make sure you verify it is the same as this one on your computer before you proceed)
Open your terminal and cd into that folder. As follows:
$ cd C:\Program Files\MySQL\MySQL Server 8.0\bin➋Then after that, type the mysqld command and hit Enter:
$ mysqldThis should start your server.
Option 2: Using the Services App.
If the above method does not work. Use this one:
➊Click the keyboard shortcut Windows Key + R. This will open the Run program.
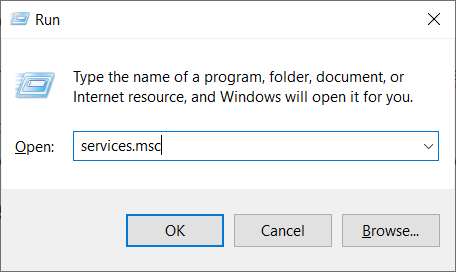
➋Type ‘services.msc‘ and hit Enter.
➌In the Services app that appears, scroll all the way down to M to locate MySQL80. Under the status column, you can check if the service is running or not. If there is nothing, then the service is not running, but if there is ‘Running‘, then for sure it is running.
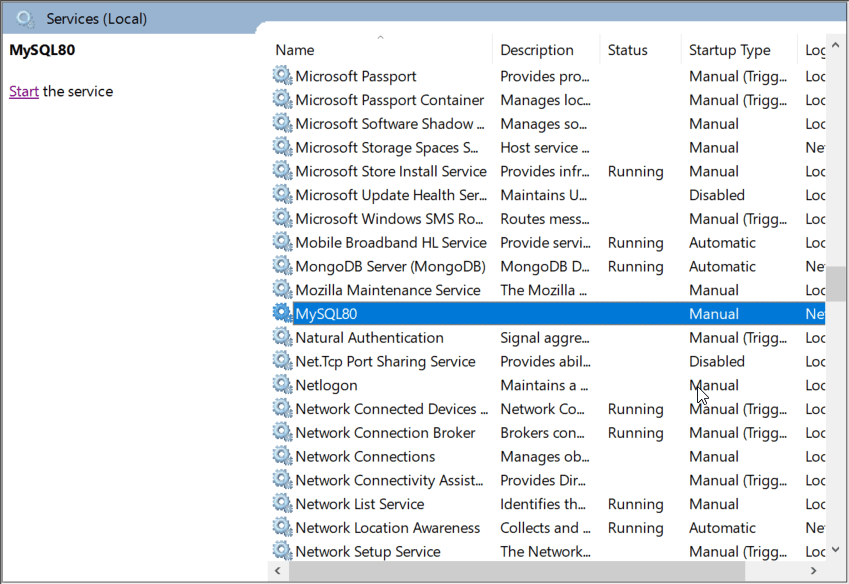
➍If it is not running, click the Start link on the left panel and wait for Windows to process the request. After that, you should be good to go. Now close the Services app and the Run app and let’s create the database.
Step 3: Create A MySQL Database.
Option 1: Create A MySQL Database using MySQL Workbench.
If you installed the MySQL Workbench, this is the perfect option for you. If you did not, feel free to use the second option.
➊On the Newly created apps, locate the MySQL Workbench and open it. It should look something like the one below.
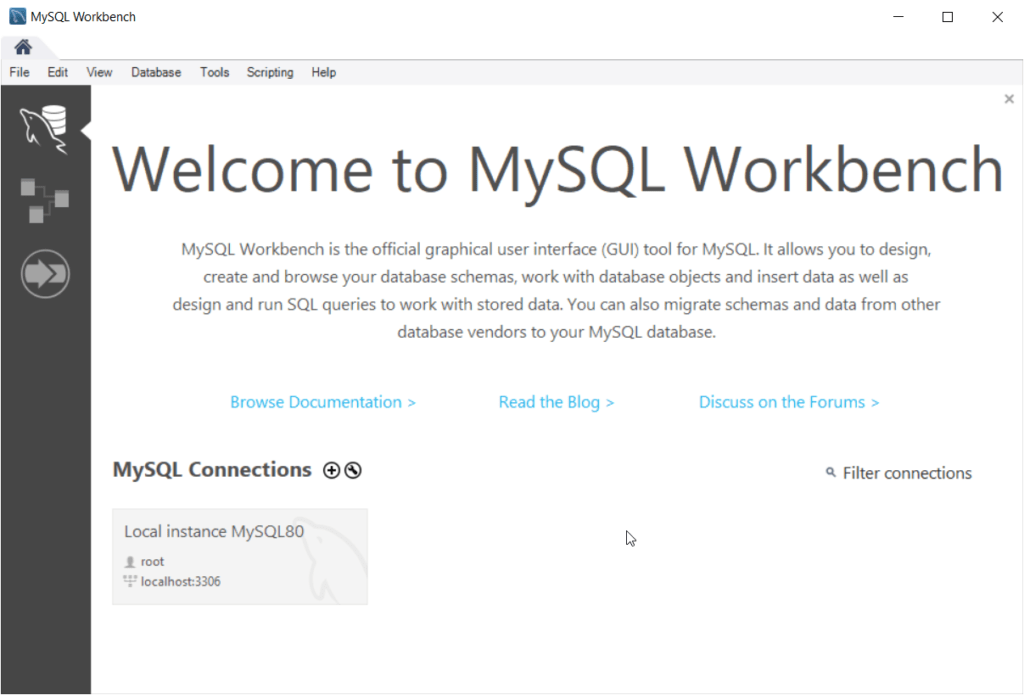
MySQL comes with a default connection already set for you called Local instance MySQL80, and inside that connection, a default database called sakila_full (This may be different for your computer); The connection’s username is ‘root‘, the password is the one you typed during the installation and the default port is 3306. We will create our database inside that same connection.
Here’s how to do it.
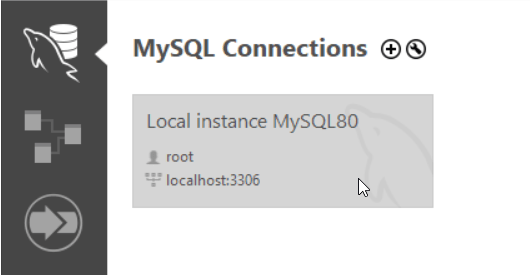
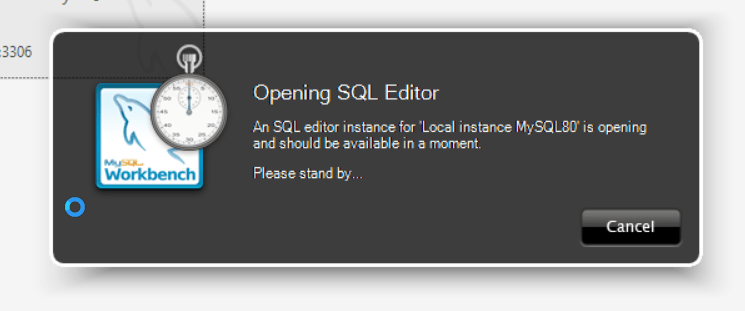
➋In the MySQL Connections tab, double-click the default connection.
This should open a SQL Editor (Your connection password may be required)
On the left panel, Under Navigator, you can see the Schemas (databases) that we have in the connection.

➌We want to create a new database, so click the database icon on the top menu.
➍Type in the name of your database and hit Apply.
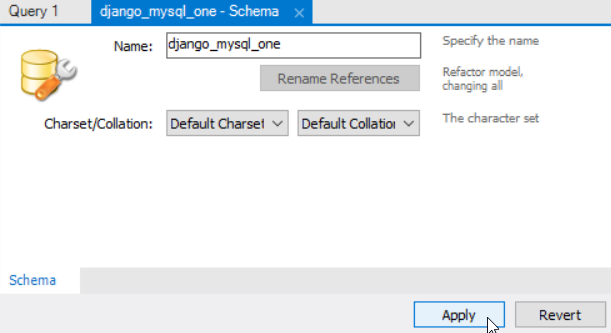
➎A new prompt may pop up, click the Apply button at the bottom to verify. Then the Finish button on the next prompt.
On the left panel, you should see your new database as part of the Schemas that belong to the connection.

And you’re done. Time to move to Django.
Option 2: Create A MySQL Database using The MySQL Command Line Client.
➊If you did not install the MySQL Workbench, this is the perfect option for you. On the newly installed apps, you should see The MySQL Command Line Client. This is where we will write commands to create our database. When you open the program, you may be prompted to type in the password of your connection. Please do so. The Command Line Client Should look like this.
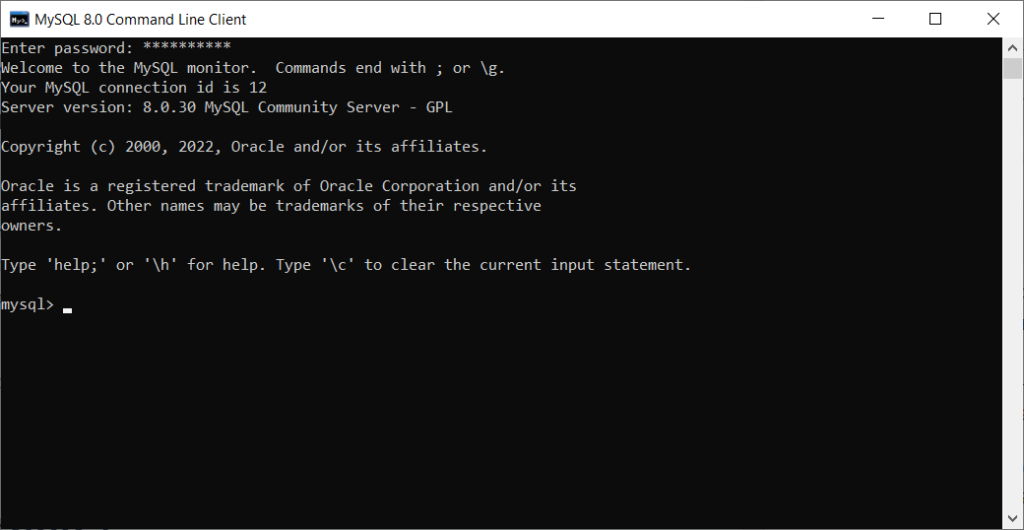
➋Type the following command:
mysql> create database database_name;Where database_name is the name of your database. Also, note the semi-colon at the end of the command, all commands here end with that❗. This command will create a database in the same connection. So the username, password, and port are the same. ➌To check if the database has been created correctly, run the show databases; command.
mysql> show databases;
+--------------------+
| Database           |
+--------------------+
| django_mysql_one   |
| django_mysql_two   |
| information_schema |
| mysql              |
| performance_schema |
| sys                |
+--------------------+
6 rows in set (0.71 sec)
This will print out the databases in the connection, you should see the one you created as part of the list.
Step 4: Please Follow Steps 4-6 From Method 1🙏.
After this point, what’s left is to configure your Django application to use the database you’ve newly created. I have covered how to do this in steps 4 to 6 of the first method. The process is exactly the same so you should not encounter any problems.
Conclusion: How To Connect To MySQL Database From Django
I really hope you made it this far. If you did, Congrats❗ This post is really long, that’s because I’ve shown two methods to connect the MySQL database with Django. However, the process of doing so is not really hard as you’ve seen, both from the Django side and the MySQL side.
On the MySQL side, all you have to do is to ✓install the applications (if you do not have them already), ✓start the server, ✓and create a new database. On the Django side, all you have to do is ✓create a Django project(If you do not have it already), then ✓install a MySQL adapter in the project, ✓change the settings.py file to point out to the newly created database, and ✓then migrate your application. That’s all. I really hope you were able to follow along. If you weren’t the comments section is open for those kinds of discussions, I’ll be very happy to help.
Otherwise, see you in other CodingGear tutorials. Peace!✌️
